What Are The Resting Poses In Yoga (Explained!)
Resting poses help your body relax, heal, and restore its balance between routines or at the end of an exhausting day.
")
The four common resting yoga poses include fish pose, corpse pose, child pose, and legs up the wall pose. These positions relax the muscles in your back and stretch out your hamstrings. You will get maximum benefits if you practice these resting poses for 10-20 minutes thrice weekly.
Resting yoga or restorative yoga focuses on stillness, long holds, and deep breathing.
These poses’ primary purpose is to give your body a break from the intense physical activity, so it can recover before going back into another pose or exercise routine.
This article will describe the four basic resting yoga poses with their benefits.
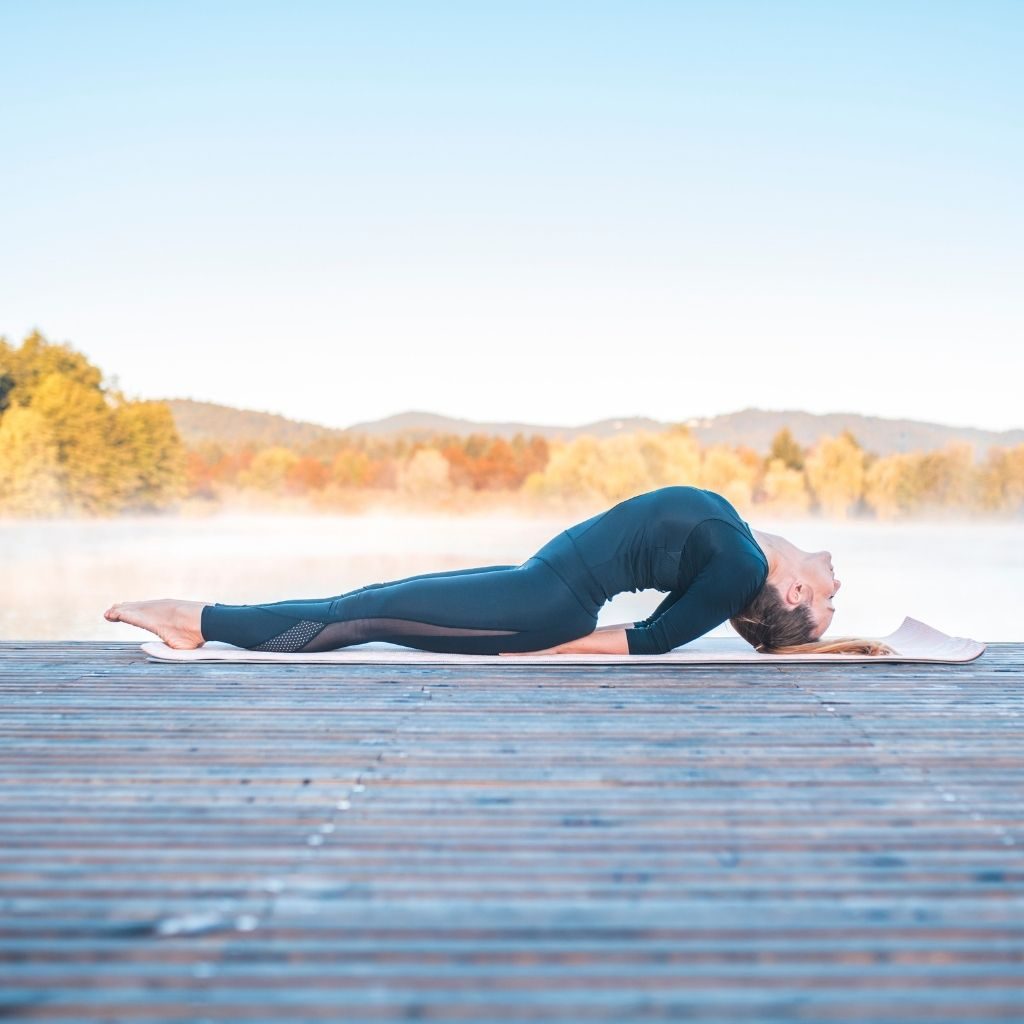
Table of contents
1. Fish pose
The fish pose or Matsyasana primarily stretches and opens up your chest, throat, abdomen, shoulders, and back. It’s a reclined, back-bending yoga posture that improves spinal flexibility and deeply stretches your body. You have to lie on your back with your chest lifted to create an arch in your upper back.
Fish pose is the perfect way to restore your posture if you’ve been sitting for most of the day.
It’s also good to have two folded blankets, pillows, or towels under your head for comfort and support. Take off your shoes or sandals and make sure your feet are lying in their most comfortable position.
Here’s how to do a fish pose:
- Place the bolster or blankets at the corner of the yoga mat, slightly apart but parallel to each other.
- Start with a sitting position and then slowly lie back, resting your shoulder blades on the blankets. Next, extend your legs and relax your arms on your side.
- Lean on your forearms and elbows to lift your chest. This step will form an arch in your upper back.
- Now, gently raise your shoulder blades and upper torso off the blankets.
- Next, move your head towards the floor until the top touches the blanket. Make sure your forearms instead of your head supports your body weight.
- Take five deep breaths in this position.
- After that, exhale slowly while lowering your torso and lifting your head. Pull your knees into your chest and breathe consciously.
- Extend your legs on the floor and rest. Then, start all over again and practice this pose for 10-15 minutes.
Benefits of fish pose
You can use the fish pose to stretch tight shoulders or back, relieve menstrual cramps, or relax after a stressful day.
Benefits of the fish pose include increased blood circulation, strengthened abdominal muscles, improved posture and alignment, and better balance. However, you should not do the fish pose if you have high blood pressure or neck and back injury.
Sitting for long periods can have inhibitory effects on your body. The fish pose helps you counter those effects by stretching your spine and enhancing flexibility.
It also reduces stress and releases muscle tension around your neck and shoulder.
2. Corpse pose
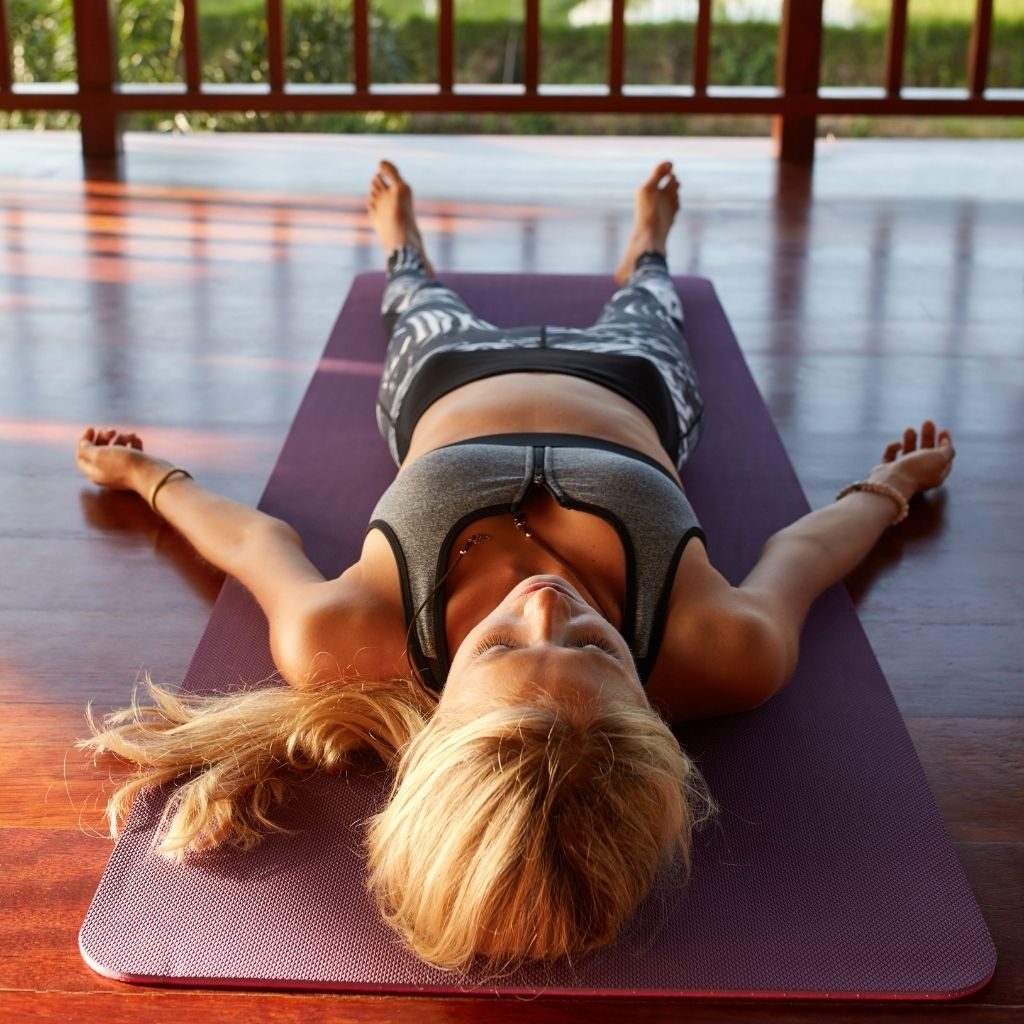
Corpse pose, also known as Savasana, is generally practiced at the end of an exercise session or before bedtime. It deeply relaxes your body and prompts stress relief. You have to lie on your back with arms at your side, palms up, legs slightly parted, and toes pointed out.
The corpse pose can be the most challenging one. However, its effects are profound if you do it well with attention to detail.
It’s essential to be mindful while doing this pose. Notice what thoughts are running through your head without judging them!
Let’s have a look at the steps of the corpse pose
- Lie on your back.
- Separate your legs and relax your arms to your sides. Let your feet and palm swing naturally.
- Breathe naturally and close your eyes.
- Feel your body heavy on the ground.
- Slowly start to release each part of your body consciously. For example, you can start from your feet and then slowly move up to the top of your head.
- Relax your face. Your eyes will go deep into the sockets, and your jaws will soften.
- Tune into your breath, not your current thoughts. You can do this by concentrating on the air as it enters and exits your nostrils. If you feel distracted, try to differentiate between the distant and closest sound around you.
Tip: You should not control your breaths. Instead, just be aware of the air without controlling its speed or pace.
- Now wiggle your toes and fingers to bring awareness back to your body.
- Keep your eyes closed and draw your knees in for a few seconds.
- Roll onto one side for a moment and rest.
- Find an upright and comfortable position to sit while inhaling deeply.
You can modify this pose with bolsters or folded blankets to support your head and legs.
Benefits of corpse pose
When done correctly, the corpse pose will relieve stress and bring a profound sense of calmness. It releases muscle tension and stretches out tight areas in your back, legs, feet, and hips. As you do the corpse pose, you will reflect on your spiritual side and higher consciousness.
The corpse pose provides your body with time to recover from the physical and mental strain of the poses practiced during a yoga session.
This pose is also good for your immune system and digestion. Moreover, it lowers your blood pressure, helps reduce headaches, and combats anxiety.
Wanna know more? 👉 Here What is The Difference Between Yoga Nidra and Savasana
3. Child’s pose
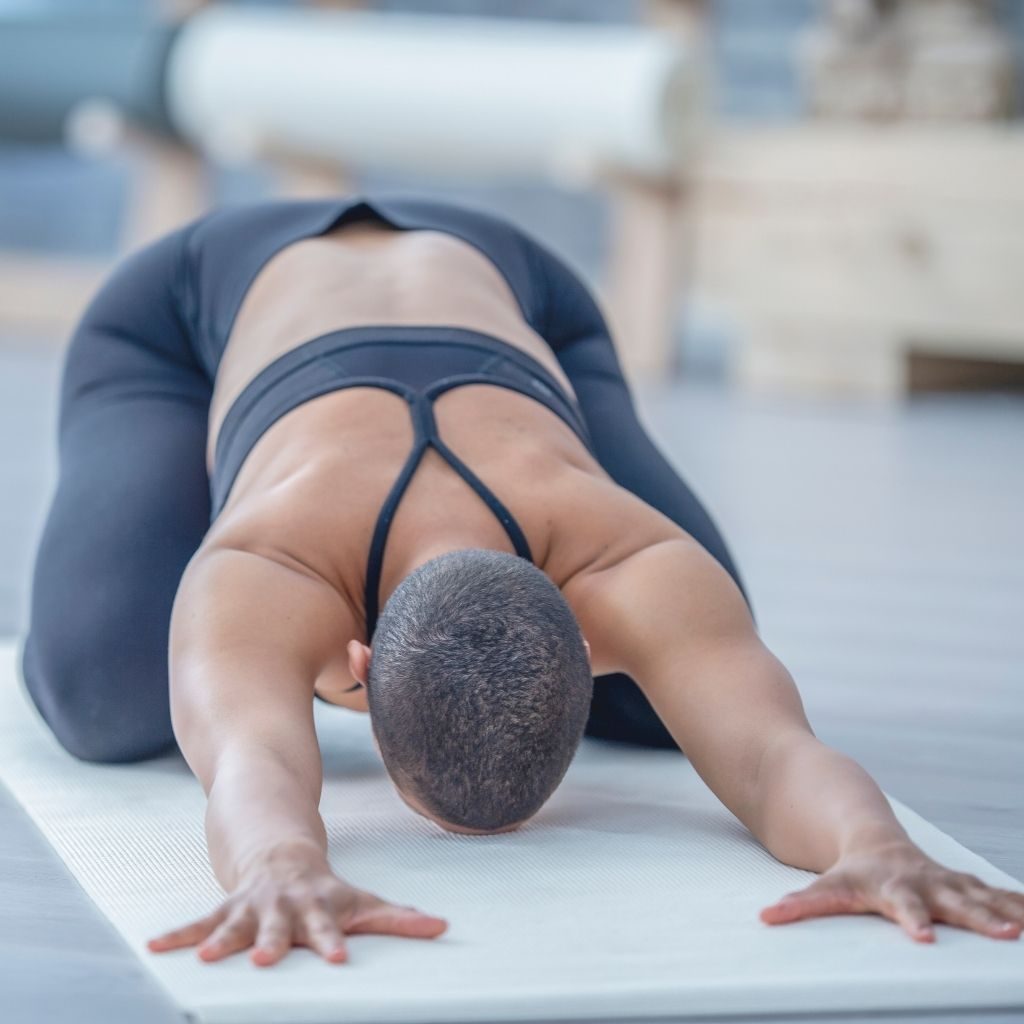
The child’s pose, also known as Balasana, is often performed between yoga poses to rest the body and mind. This pose stretches and relaxes your thighs, hips, and ankles for better flexibility. You can practice the traditional form of this asana by kneeling with toes touching behind your buttocks and sitting back onto your heels.
Other variations include placing your hands at your temples to stretch the neck region or putting them behind your back to enjoy a more restful position for the spine.
These poses will provide relief from headaches associated with tense muscles.
The child’s pose is named due to its resemblance to an infant resting on their caregiver’s lap.
Here’s how to do the child’s pose
- To start, kneel on the floor with your knees wide apart. Your toes should touch your thighs.
- Put your palms over your thighs.
- Lean forward and place your torso between your knees while exhaling slowly.
- Put your arms out beside you and keep your palms on the floor.
- Next, tuck your shoulders forward. Hold your position as long as you feel comfortable.
If you are pregnant, place a pillow under your torso for support. Moreover, if your body isn’t flexible, your buttocks will likely not touch your heels. However, you can use a rolled-up blanket between your thighs and calves to counter this issue.
Note: Refrain from practicing the child’s pose if you have recently suffered from a knee injury.
Benefits of child’s pose
Practicing the child’s pose helps relieve stress and fatigue while improving circulation and digestion. In addition, it soothes your brain and restores balance to the body.
Other benefits include increased flexibility, relief from lower back pain, increased blood flow to lungs for better breathing capacity, and more energy.
4. Legs up the wall pose
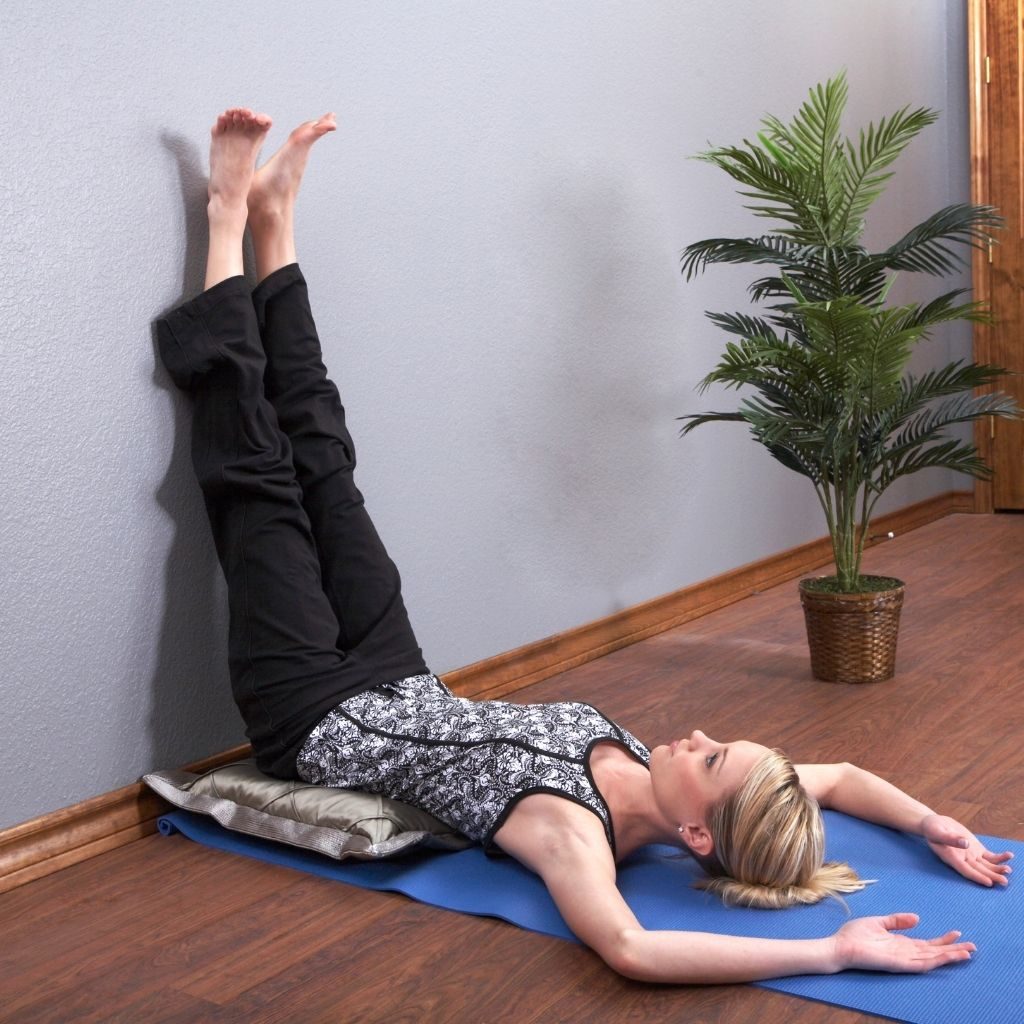
Legs up the wall pose or, Viparita Karani, is a therapeutic method to relieve stress and fatigue. You have to lie on your back for around 10-20 minutes with your legs straight up against the wall. The goal is to keep them perpendicular to the floor to encourage blood circulation.
You may place a pillow or rolled towel under your neck if you need extra support for your head and shoulders.
Here’s how to do the leg up the wall pose
- First, place the end of your yoga mat near a wall.
- Sit on the mat with your right side against a wall with bent knees.
- Lie down and swing your legs up against the wall.
- Rest your arms on your sides (or anywhere you like), then keep your hips against the wall for 10-20 minutes.
- Inhale and exhale deeply.
- Relax your body and let your legs sink to the floor.
- Hug your knees into your chest and roll towards your right side for a while.
- Repeat the above steps if you want another go.
Note: If you have medical conditions such as hernia, hypertension, or glaucoma, it’s best to avoid leg up the wall pose.
Benefits of legs up the wall pose
The legs up the wall pose is a practical, simple way to relieve stress. It’s good for blood circulation in your lower body and can help you sleep better. Moreover, this pose relieves sciatica pain, improves thyroid function, and provides relief from menstrual cramps.
You can do this pose any time, but it has different effects depending on when you practice.
For example, if you do this before going to sleep at night, you will feel more relaxed and sleepy.
On the other hand, practicing the leg up the wall pose after a workout will help your muscles recover quicker by reducing muscle soreness and inflammation.
The restorative power of this pose also helps your mind relax from stress or anxiety that may have built up during the day.
Conclusion
If you need a way to relax and re-energize after work, try resting poses.
The most common and easiest resting yoga poses are the fish pose, corpse pose, child’s pose, and leg up the wall pose. You can use bolsters, folded blankets, or blocks for additional support. However, you should consult your doctor or physiotherapist before doing these poses if you have safety concerns or severe health issues.
Are you hoping to deepen your yoga practice?
Discover your true self on an exotic Yoga Retreat. Relax on the sandy beaches and experience pure joy through various activities like surfing, horse-riding, and hiking!
Who says that taking a break from your busy life means giving up on your yoga practice?
A yoga retreat will reinvigorate you by focusing on self-reflection, body healing, and community bonding.
Read also: